Audio/Narration in PowerPoint Presentations
Preparing for your Narration
Why Narrate?
Many faculty are already putting their slide presentations on the web. This
gives students the opportunity to review the lecture materials on their own,
even those that did not make it to class. However, it does not give them the
whole picture. The majority of slide presentations consists largely of chunks
of disconnected text, brief to the point of becoming useless without the additional
explanations of the speaker. In fact, the outline view of the presentation
is often the better and more efficient way of distributing the information.
Therefore, the use of narrated presentations is recommended to reach out
to distance learners, to accommodate to different learning styles, and for
accessibility purpopses. In distance learning applications, a narrated lecture
is a useful complement to the usual reading materials, and provides a good
basis for subsequent class discussions via discussion boards or synchronous
software. Lectures should be available in the largest variety of formats possible
to reach all learner types. Narrated presentations simultaneously provide
both aural and visual content and is therefore more effective. Beyond different
learning styles and issues of memory retention you should also always consider
accessibility issues. While narrating the lecture helps out the visually handicapped,
you need to also provide a purely visual format. It is highly recommended
that you make the transcript available as a plain text document, which can
also be printed out.
Design Tips
To create the best online presentations, we suggest using the following guidelines:
• Design the online presentation to optimize the bandwidth capabilities
of the audience. If the audience has fast, broadband connections to view the
online presentation, you can create a graphic intensive presentation that
includes many animations. However, if the audience has slower connection speeds
(<56kbps), graphic images should be used sparingly to insure the audience
has a good viewing experience.
• Create a written script of the audio presentation. Speaking into a
microphone can often be more difficult than giving the presentation to a live
audience. To insure a smooth delivery covering all important points, we recommend
completely scripting the presentation before recording.
• Use white or light-colored background and black or dark-colored text.
Black text on white background is still the best combination for a professional
image. If you must use other colors for text and background, make sure ther
is high contrast between your background and text colors and not just different
shades of the same color.
• Do not use too many fonts on one slide, or in one presentation (limit
to 2 types). It is recommended to use TrueType fonts (more legible), such
as: Times New Roman, Arial, Georgia, and Verdana.
• Be careful of the font size you use. Text setting varies between platforms,
therefore it is recommended to use a font size no smaller than 12 pts.
• Add animations to the presentation. Animations add impact to a message
and will improve the overall viewing experience of the audience.
• Your first slide can be your title slide, which you can use to introduce
yourself and provide some preliminary information about the structure and
scope of your presentation. After recording your introductory slide narration,
it is recommended that you listen to it before proceeding to the next slide.
If you are satisfied with the sound quality, then continue.
• Record your narration for the entire presentation as if you were presenting
it. Then run your presentation, and sit back and listen. You get an entirely
different perspective when you pretend to be the audience. Listening to your
presentation enables you to pick up on awkward moments, unclear passages,
and boring spots much more easily.
• View the presentation online before releasing it.
Preparing your Script
The first and most crucial step in creating a media presentation is creating
a script. A script is a written document containing everything you want to
say in your presentation.
It is very important that you write a script of your narration before you
begin recording. You may be a great speaker, but deciding what you will say
ahead of time will give you a better chance of creating an effective presentation.
When writing your script, organize the content of your narration by each slide.
It is advised to keep the narration for any given slide to less than 1 minute.
While longer narrations are certainly acceptable, there is some increased
risk of losing the interest of the audience if narrations go on too long.
To produce successful narrated presentations, your main goal should be to
keep your listeners interested and focused. As a recorded voice can put anyone
to sleep pretty quickly, it is necessary to break long presentations into
small chunks of no more than 15 minutes to avoid your audience from becoming
distracted.
Using a Microphone
The way a microphone is used can greatly affect the quality of an audio recording.
Here are some tips for using a microphone with PowerPoint:
• Position stand microphones the correct distance from your mouth.
Microphones are designed for use at a specific distance. If the microphone
is too close, it may pick up unwanted sounds like “breaths” that
will degrade the audio quality. If the microphone is too far, it may provide
a very low level signal.
• Keep a constant distance between the microphone and yourself while
recording. Changing that distance will degrade the overall audio recording.
• Position headset microphones at the side of your mouth, not directly
in front. This will prevent unwanted sounds like “breaths”.
• Record in a quiet environment. Loud background noise can affect recording
quality. In addition, carpeted floors and padded walls help improve the recording
environment.
• Add a windscreen to the microphone. Windscreens help reduce the effects
of “breaths” that may be picked up during recording.
• When recording audio, advance the slide first, then pause, then start
recording. Do this for each slide. If you try to advance to the next slide
while talking, a portion of the audio may be lost.
• Pause before and after each slide transition when recording the narration.
Back to the Top
Adding Audio/Narration to Individual Slides
We have divided the task of adding audio or narration to individual
slides into 2 steps:
• Step 1: Start.
• Step 2a: Adding audio/narration
from an exsisting sound file on your computer.
• Step 2b: Adding audio/narration
that will be recorded in PowerPoint.
After you have added your audio/narration to the desired slide, you
can make changes to the sound icon on the slide:
• I.: Change when the
sound is played.
• II.: Move the sound icon to
another location on/off the slide.
• III.: Hide the sound icon during
the slide show.
Step 1: Start
• Open presentation.
• Select the slide you would like to insert the sound file.
• Go to: Insert >Movies and Sounds.
• Here you can choose an existing sound file (Sound from File…)
or record your sound (Record Sound).
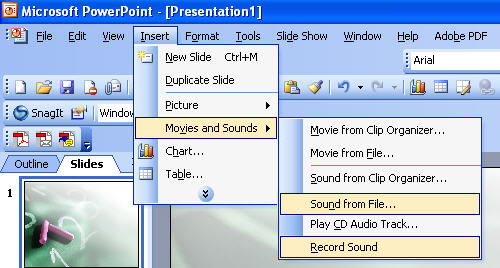
If you choose Sound from File, go to: Step
2a.
If you choose Record Sound, go to: Step
2b.
Step 2a: Adding audio/narration
from an exsisting sound file on your computer
• If you chose to insert from file, the Insert Sound
dialog box will appear.
• Choose the desired sound file (WAV format) on your computer, select
the sound file, and then click OK.
• The sound file is now linked to your presentation.
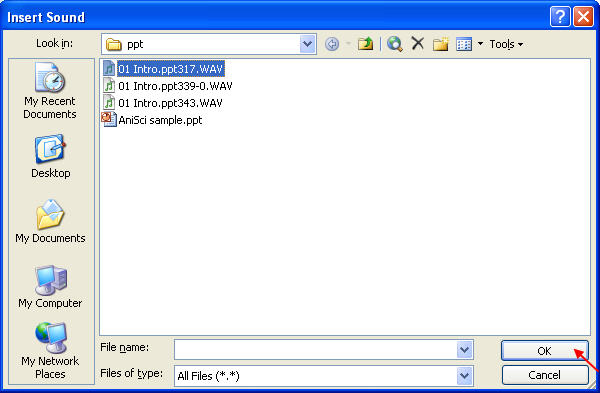
THE SOUND FILES MUST BE PLACED IN THE FOLDER THAT CONTAINS
THE POWERPOINT PRESENTATION. NOT DOING SO MAY CAUSE PROBLEMS WHEN YOU ARE
VEIWING THE PRESENTATION LATER.
• You will now be prompted to choose if you want the sound to start
Automatically or When Clicked.
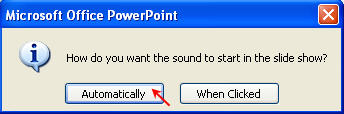
• If you choose Automatically, the sound will start
playing as soon as the slide is open.
• If you choose When Clicked, the sound will start
playing when you double click on the sound icon.
• The sound icon  will appear on the slide.
• The sound will stop when the file ends or when you advance to the
next slide.
Step 2b: Adding audio/narration
that will be recorded in PowerPoint
• If you chose to record a voice narration, the Record
Sound dialog box will appear.
• Enter a name for your sound file (e.g. Sound_01).
• To optimize the audio quality, position the microphone within several
inches of your mouth but not directly in front of it.
• Click on the red record button when you are ready to record. The length
of your recording will begin counting in seconds (Total sound length).
• Click on the blue stop button when you are finished recording.
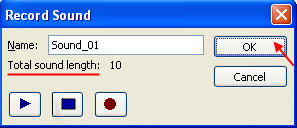
• Click OK when finished, the sound icon
will appear on the slide.
OPENING UP ANY OTHER APPLICATIONS WHILE USING THE RECORDING
FUNCTION WILL DISABLE THE RECORDING.
• The default setting for when the sound will start playing is: Automatically
(when the slide is open).
• The sound will stop when the file ends or when you advance to the
next slide.
If you want to make changes to the sound icon
I. To change when the sound
is played
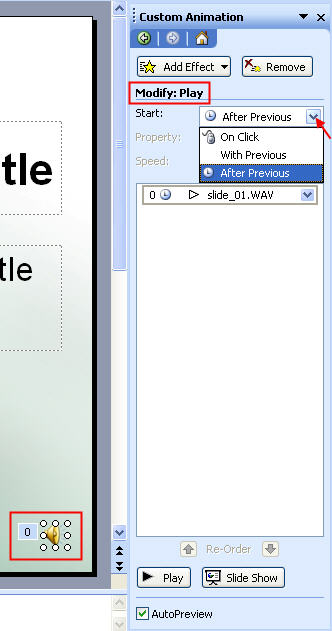
• Go to: Slide Show>Custom Animation…, the
Custom Animation dialog box will appear.
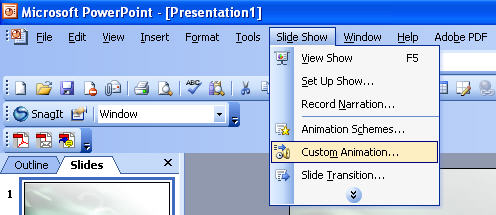
• Select the sound icon.
• Under Modify:Play, pull down the Start:
bar and select from the options.
II. To move the sound icon
to another location on the slide or off the slide (in the grey area)
• Select the sound icon and move it with your mouse.
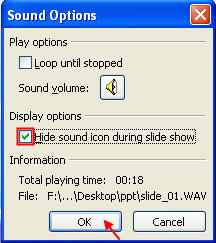
III. To hide the sound icon
during the slide show
• Right click on the sound icon and click on Edit Sound Object,
the Sound Options dialog box will appear.

• Under Display Options, check the box (Hide
sound icon during slide show), and then click OK.
Back to the Top
Voice Recording in PowerPoint
We have divided the task of recording your narration in PowerPoint
into 5 steps:
• Step 1: Start.
• Step 2: Setting microphone
level.
• Step 3: Selecting sound quality.
• Step 4: Linking or Embedding
sound files to your presentation.
• Step 5: Recording your narration.
If you need to stop before completing your narration, you may continue
recording from where you left off. Follow the directions
provided.
Step 1: Start
• Go to: Slideshow >Record Narration…
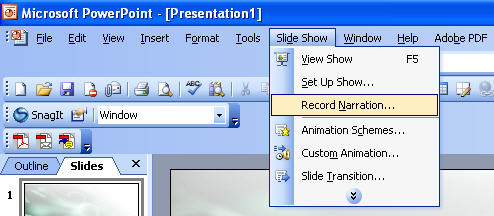
• The Record Narration dialog box will appear.

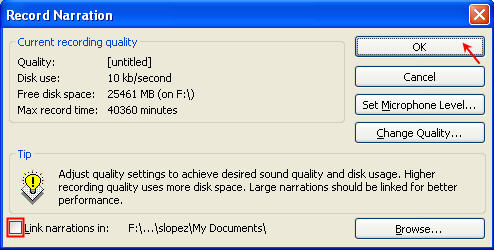
Step 2: Setting microphone level
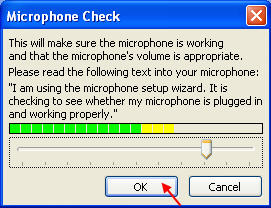
• Click on Set Microphone Level…, the Microphone
Check dialog box will appear.
• To optimize the audio quality, position the microphone within several
inches of your mouth but not directly in front of it.
• As instructed, read the passage into the microphone (the slide bar
at the bottom will automatically adjust level).
• Click OK when finished to return to the Record
Narration dialog box.
Step 3: Selecting sound quality
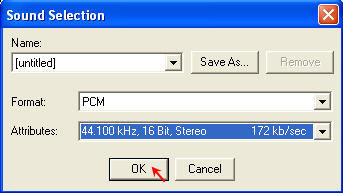
• Click on Change Quality…, the Sound
Selection dialog box will appear.
• If you will use a compressing software later, select Attributes:
to be 44.100kHz, 16 Bit, Stereo, 172 kb/sec.
• If you will not have the files compressed later, select Attributes:
to be 22.050kHz, 16 Bit, Mono, 43kb/sec.
• Click OK when finished to return to the Record
Narration dialog box.
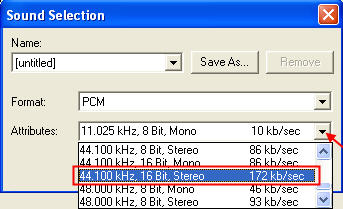
THESE RECCOMMENDED SOUND QUALITY SETTINGS WILL GIVE YOU A
BETTER SOUND QUALITY FOR YOUR PRESENTATION. REMEMBER, HIGHER SOUND QUALITY
USES MORE DISK SPACE.
Step 4: Linking or Embedding sound files to
your presentation
• You can choose to either link your narrations/audio files
or to embed the sound files into the presentation.
• Check the box (Link narrations in:) if you would
prefer to link the sound files to the presentation.
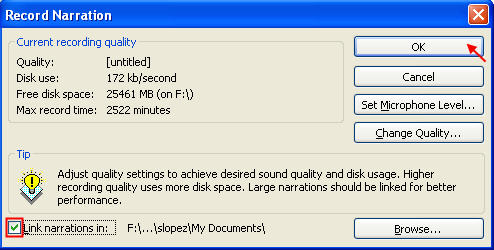
• If you link the sound files to the presentation the sound files
(.wav format) will be saved separately while remaining linked to your slides
and the presentation file will remain its original size.
YOU MUST SAVE THE SOUND FILES DIRECTLY TO THE FOLDER THAT
CONTAINS THE POWERPOINT PRESENTATION. NOT DOING SO MAY CAUSE PROBLEMS WHEN
YOU ARE VEIWING THE PRESENTATION LATER.
• Leave the box (Link narrations in:) unchecked if
you would prefer to embed the sound files into the presentation.
• If you embed the sound files into the presentation, the file size
of the presentation will become larger.
EMBEDDING THE AUDIO INTO YOUR PRESENTATION WILL CAUSE LESS
CONFUSION LATER WHEN YOU ARE VEIWING THE PRESENTATION AND FOR COPH PURPOSES.
• Click OK and PowerPoint will immediately launch
the first slide of your presentation as a slide show.
YOU MUST BE READY TO START RECORDING WHEN YOU CLICK ON THE
OK BUTTON.
• Back to: Competing Narration in PowerPoint.
• Back to: Editing Narration in PowerPoint.
Step 5: Recording your narration
• Start recording your voice.
• To temporarily pause your narration (to collect your thoughts or catch
your breath), right-click anywhere on the screen with the mouse, a drag down
menu will appear.
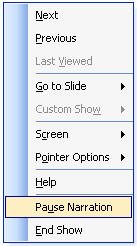
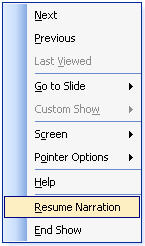
• Click on the Pause Narration option. To resume recording,
right-click again and choose the Resume Narration option.
DO NOT USE THE ESCAPE (ESC) KEY ON THE KEYBOARD
TO PAUSE NARRATION. THE ESCAPE KEY SHOULD ONLY BE USED IF YOU NEED TO STOP
BEFORE COMPLETING YOUR NARRATION (END THE SLIDE SHOW).
• To skip a slide during your narration, pause the narration, and
then click on the slide you want to narrate next. Resume the narration on
the slide you want to record.
• To advance to the next slide while recording your narration, press
the space bar on the keyboard or click once on the mouse and continue.
• Carry on for the subsequent slides in your presentation.
• When you finish recording audio to the last slide in the presentation,
advance to the black screen that tells you the slide show has ended.
IF YOU END THE SLIDESHOW AT THE LAST SLIDE INSTEAD OF ADVANCING
TO THE BLACK SCREEN, YOU WILL NOT SAVE THE NARRATION FOR THAT LAST SLIDE.
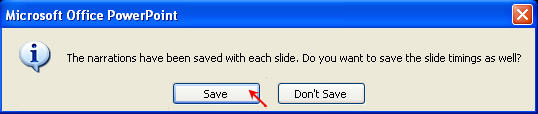
• A message box will appear telling you that your recordings have
been saved to each slide. The message box will also ask you to save the slide
timings, click Save.
• PowerPoint will then display your entire slide layout in slide sorter
view with all of the audio timings.
• A sound icon
will appear on your slides. You may move it to another location on the slide
by selecting it and moving it with your mouse.
• Check the narration by viewing your presentation as a slide show.
Or, you can check slide-by-slide in normal view by double clicking on the
sound icon. Or, use the Play button in the Custom
Animation dialog box.
IT IS IMPORTANT TO CHECK THE SOUND OF YOUR NARRATION, SO
YOU CAN GO BACK AND MAKE CHANGES IF NEEDED.
• When you launch the slide show it will automatically play your narrations.
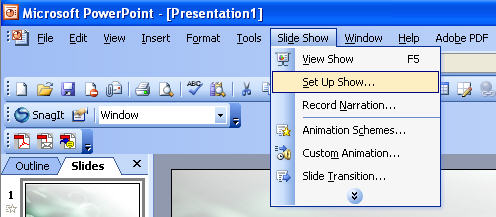
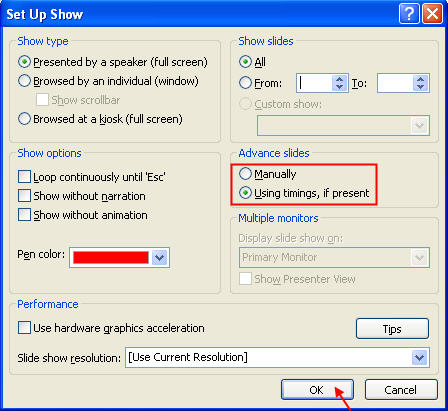
• If you have saved slide timings but want to run the presentation
without the timings, go to Slide Show>Set Up Show…,
under Advance slides, click Manually. When
you want the timings on again, click Using timings, if present.
• If you want to change when the sound is played, go to: Slide
Show>Custom Animation…
• Select the sound icon, under Modify:Play, pull down
the Start: bar and select from the options.
If you need to stop before
completing your narration
If you are forced to stop before you can complete the slide show, you can
go back and start where you left off.
• To stop (end the slide show), press the ESCAPE (ESC)
key on the keyboard. Or, you can right-click anywhere on the screen with the
mouse, a drag down menu will appear.
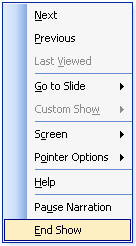
• Click on the End Show option.
• A message box will appear telling you that your recordings have been
saved to each slide. The message box will also ask you to save the slide timings,
click Save.
• When you are ready to continue, select the slide where you stopped
(a sound icon
will appear on each slide that has a sound clip recorded to it).
• Again, follow Step 1 to Step
4 above.
• This time, when you click OK, a message box will
appear telling you that you can start the narration anywhere within the presentation.
• It then gives you the option of starting at the First Slide
or the Current Slide (the selected slide), click Current
Slide.

• Begin narrating that slide and continue through to the end (Step
5).
Back to the Top
Editing your Narration in PowerPoint
If you wish to edit your narration in PowerPoint, you can choose
to re-record your entire narration or just a single slide:
• I.: Re-recording your entire
narration.
• II.: Re-recording a single
slide.
I.: Re-recording your entire narration
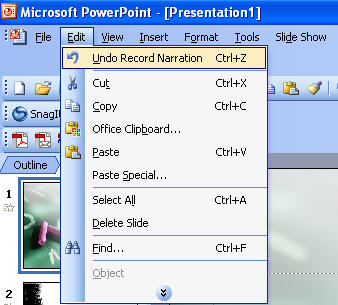
• If you wish to re-record your entire narration, go to Edit>Undo
Record Narration, which will delete your entire narration.
• Follow Step 1 to Step
5, the same steps used to record the first narration
to record your entire narration again.
IF YOU DO NOT SELECT Edit>Undo Record Narration,
YOU WILL RECORD A SECOND NARRATION ON TOP OF THE ORIGINAL ONE.
II.: Re-recording a
single slide
• If you wish to re-record your narration on a single slide, select
the slide in normal view, click on sound icon and click delete.
IF YOU DO NOT DELETE THE SOUND ICON BEFORE YOU START RE-RECORDING,
YOU WILL RECORD A SECOND NARRATION ON TOP OF THE ORIGINAL ONE.
• Add a blank slide AFTER the slide you wish to re-record and select
the slide you wish to re-record.
• Follow Step 1 to Step
4 of the same steps used to record the first narration to record
the narration for the selected slide again.
• This time, when you click OK, a message box will
appear telling you that you can start the narration anywhere within the presentation.
It then gives you the option of starting at the First Slide
or the Current Slide; click Current Slide.
• PowerPoint will immediately launch the current slide (the slide
you selected for re-recording) as a slide show.
• Once you have completed the narration of that slide, you must advance
to the blank slide and press the ESCAPE (ESC) key on the
keyboard to stop the narration (end the slide show).
• When you have completed the narration for that slide and have saved
the timings, save your presentation, then delete the blank slide.
DO NOT STOP THE SLIDE SHOW UNTIL YOU ADVANCE TO THE BLANK
SLIDE. YOU MUST INSERT THE BLANK SLIDE BEFORE YOU BEGIN RE-RECORDING THE SLIDE.
IF YOU DO NOT INSERT A BLANK SLIDE, YOU WILL EITHER NOT GET THE SLIDE SOUND
CLIP SAVED IF YOU DO NOT ADVANCE TO THE NEXT SLIDE, OR IF YOU DO ADVANCE TO
THE NEXT SLIDE, YOU WILL DELETE THE SOUND CLIP FOR THAT SLIDE WHEN YOU STOP
THE SLIDE SHOW.
Back to the Top
Converting WAV files to MP3 format (for
the sound files linked to your presentation)
Since WAV files are large files and will take a long time for a student to
download from the internet, converting the files to MP3 files would be recommend
to decrease the size of the presentation.
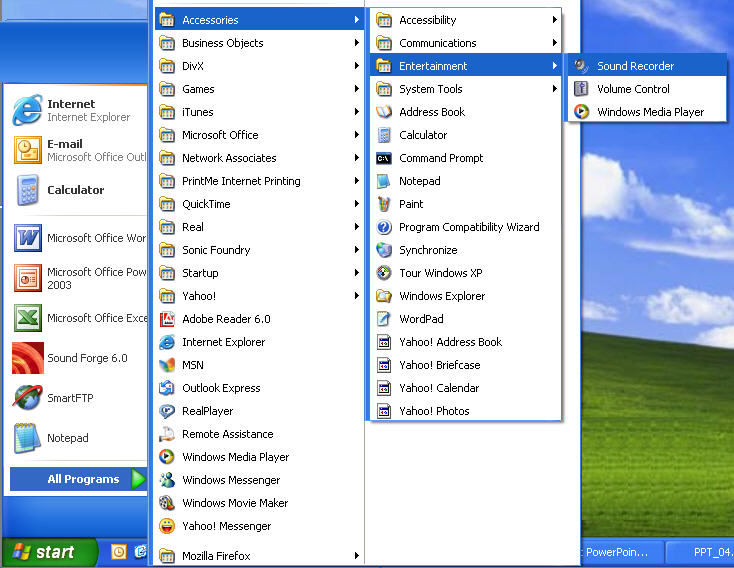
• To open Sound Recorder go to: Start>Programs>Accessories>Entertainment>Sound
Recorder.
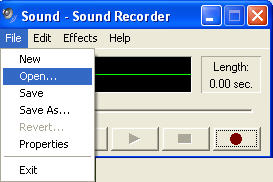
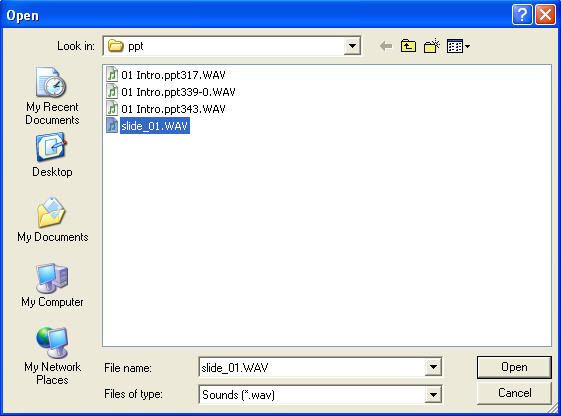
• Go to: File>Open…, open the sound file
you would like to convert.
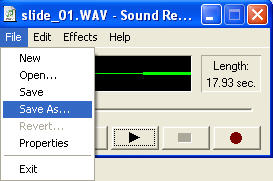
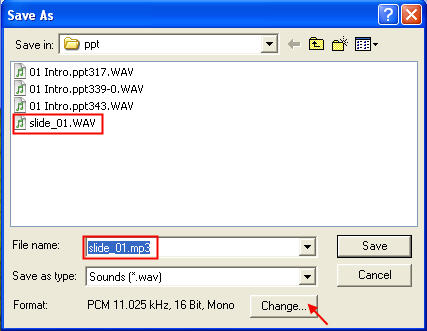
• Go to: File>Save As…, the Save
As… dialog box will appear.
• Change the name of the sound file to .mp3. (e.g.
slide_01.mp3).
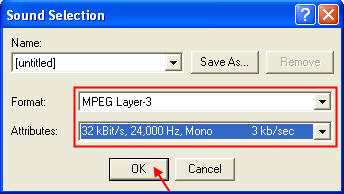
• Click on Change..., the Sound Selection
dialog box will appear.
• Select Format: to be MPEG Layer-3.
• Select Attributes: to be 32 kb/sec, 24,000
Hz, Mono 3 kb/sec.
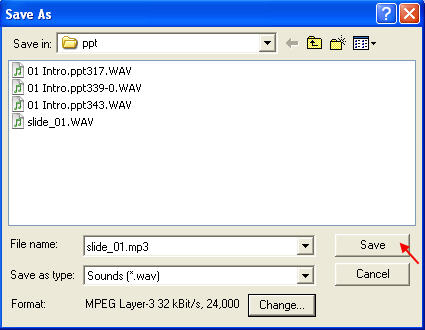
• Click on OK when finished to return to the Save As…
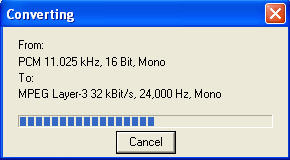
dialog box.
• Click on Save, you will then see Sound
Recorder converting the WAV file to MP3.
Back to the Top